
Improved Features1
- TR BAND Compression Device now with improved features delivers the same performance as the first generation
- New balloon design allows for better visibility of the green marker
- New scalloped edges designed to improve patient comfort
Patent Hemostasis1
- Delivers the benefits of patent hemostasis
- Dual compression balloons provide precise compression of the radial artery without compromising local nerve structure
Innovation That Performs1
- Innovative design makes TR BAND Compression Device extremely easy to use
- Air titration provides a more precise way of applying pressure to the radial artery
Product Overview

Improved Balloon Design
Better visibility of green radial artery marker
Scalloped Edges
Designed to improve patient comfort
Enhanced Hook and Loop Coverage
Designed to maximize secure attachment
Clip Feature
Secures inflation tube to keep connector from hanging
Left and Right Hand Marker
To apply band on accurate radial access site, reducing operator risk of misplacement
Redesigned Inflator Tip
To prevent misconnection to Introducer sheath
TR BAND Application and Removal Instructional Video
Contact Your Territory Manager
Obtain a physical copy of the TR Band Application and Removal Badge
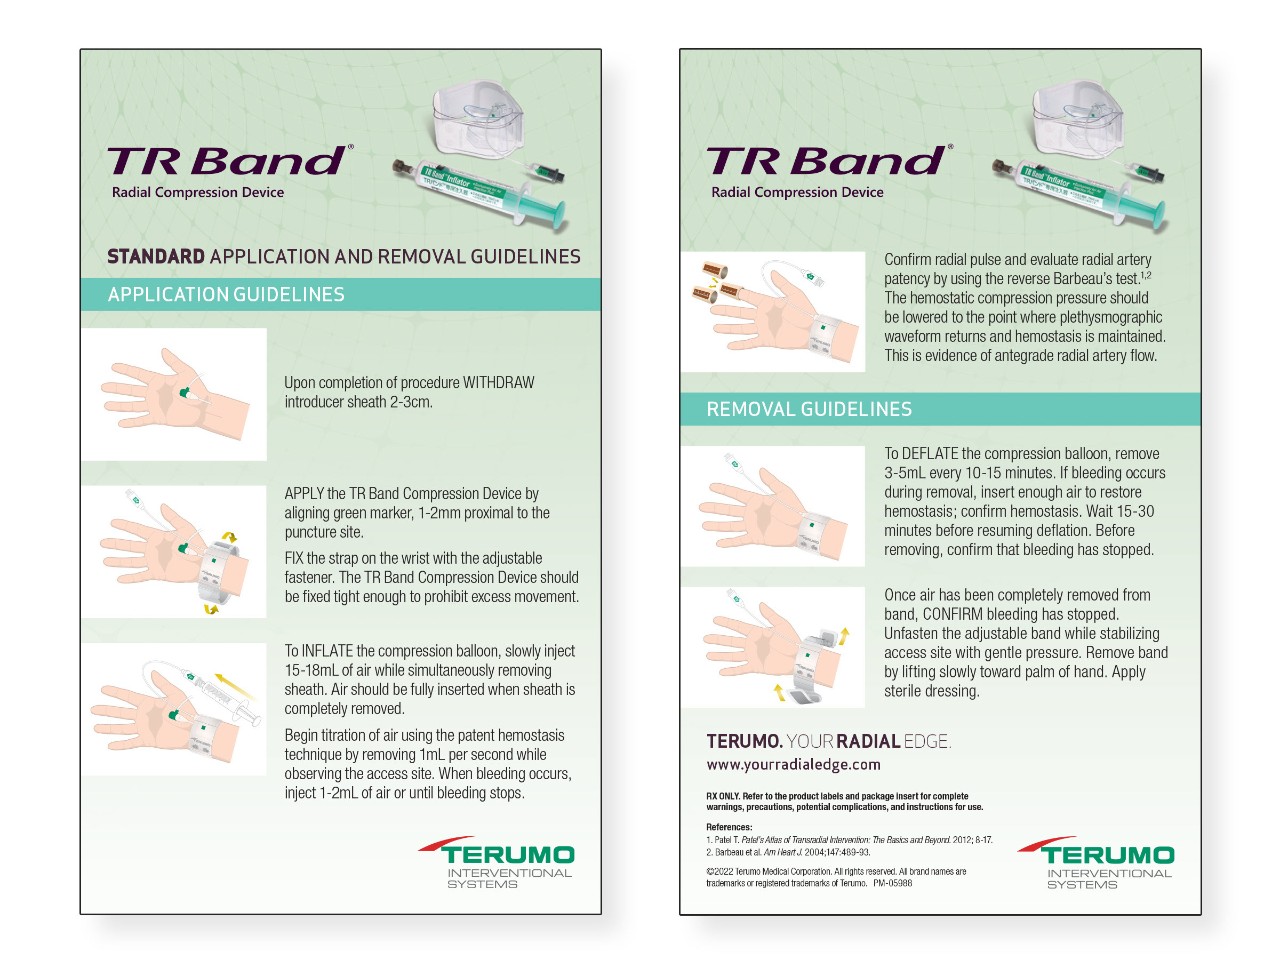
APPLICATION GUIDELINES
Patent Hemostasis Technique
- Upon completion of the procedure, withdraw introducer sheath 2–3 cm.
- Apply the TR BAND Compression Device by aligning the green marker (located on the center of the large compression balloon) 1–2 mm proximal to the puncture site, and fix the strap on the wrist with the adjustable fastener. The TR BAND Compression Device should be fixed tight enough to prohibit the band from spinning.
- NOTE: This device must be positioned differently on the left versus right wrist. Ensure the Terumo logo on the support plate is closest to the patient’s little finger.
- Slowly inject 15–18 mL of air while simultaneously removing the sheath. Air should be fully inserted when the sheath is completely removed.
- NOTE: The goal is for bleeding to cease when the sheath is completely removed.
- Begin titration of air using the patent hemostasis technique by removing 1 mL per second while observing the access site for bleeding. When bleeding occurs, inject 1–2 mL of air or until bleeding stops.
- Confirm radial pulse and evaluate radial artery patency using the reverse Barbeau’s test:
- Place the plethysmographic sensor on the thumb or index finger and observe pulsatile waveforms.
- Compress the ulnar artery at the wrist and observe the waveform.
- If plethysmographic waveform disappears, lower hemostatic compression pressure until waveform returns while maintaining hemostasis. This confirms antegrade radial artery flow.
REMOVAL GUIDELINES
Heparin 50 units/kg or less — band remains in place 60 minutes. Heparin (or comparable agent) greater than 50 units/kg — band remains in place for 120 minutes.
- Place oxygen saturation probe on thumb or index finger of access site hand to confirm patent hemostasis.
- Remove 3–5 mL every 10–15 minutes.
- NOTE: As an alternative, to accelerate removal of the TR BAND Compression Device, the operator can slowly deflate the device in one step.
- If bleeding occurs during removal, insert enough air to restore hemostasis; confirm patent hemostasis. Wait 15–30 minutes, then repeat step 2.
- Once air has been completely removed from the band, confirm bleeding has stopped. Unfasten the adjustable band while stabilizing the access site with gentle pressure. Remove the band by lifting slowly toward the palm of the hand.
- Apply sterile dressing.
- NOTE: Guidelines are based on compilation of best practices. TR BAND Compression Device removal protocols should be consistent with the needs of the provider(s) and patient. Air injection volume and compression time may differ according to the patient’s condition, anticoagulation, and puncture site size. Check the puncture site frequently and adjust accordingly.
Additional Resources
| Product Code | TR Band Type | Length (cm) | Quantity |
| TRB24-REG | Regular |
24 |
5/box |
| TRB29-LRG | Large |
29 | 5/box |
What is the TR BAND Compression Device?
The TR BAND Compression Device is used post trans-radial access procedures, such as coronary angiography or percutaneous coronary intervention. When the TR BAND Compression Device is applied to the wrist, the dual balloons provide precise compression of the radial artery, without compromising local nerve structure, helping to achieve patent hemostasis. Designed for patient comfort and effective pressure control, the trans-radial band helps minimize the risk of complications like radial artery occlusion or hematoma.
How does the TR BAND Compression Device help with achieving patent hemostasis?
The TR BAND Compression Device has dual compression balloons that provide precise compression of the radial artery without compromising local nerve structure. The transparency of the band allows for easy monitoring of the puncture site, while air titration provides a more precise way of applying pressure to the artery. Overall, the band helps to achieve hemostasis at low pressures, minimizing the chances of applying occlusive pressures and causing complications like radial artery occlusion or hematomas.
How is the TR BAND Compression Device removed?
Please be sure to follow hospital protocols and guidelines when removing the TR BAND Compression Device. Terumo offers guidelines for application and removal, which are provided on the device product page for reference. To remove the TR BAND Compression Device, we recommend a gradual deflation protocol to ensure safe hemostasis. Slowly deflate air from the band in small increments of 3- to 5-mL at a time while observing the puncture site. After each increment of air is removed, maintain compression utilizing the transradial device, and wait for a 10- to 15-minute period. If no bleeding occurs, continue deflating the device, followed by the same waiting period, until it is fully empty. Remove the band carefully holding light manual pressure if needed. If bleeding occurs, slowly reinflate the band with 1- to 2-mL of air until bleeding stops. Always follow institutional guidelines and monitor for hematoma or re-bleeding after the band has been removed when bleeding has stopped.
Related Products


References
- Data on File